Elastic Email Typescript Angular API Library
Introduction
When you integrate Elastic Email with your application, you can interact with your Elastic Email account directly by our API. You can easily integrate your email flow, manage your contacts and templates, send emails, and track email statistics directly from your app.
This page will help you easily integrate with Elastic Email using the Typescript Angular library. You can find our whole downloadable Typescript Angular repository on GitHub here. If you need API documentation, you can find it here.
Elastic Email API v4 uses REST architecture, which allows you to perform various code actions, including directly through your app.
The maximum email size of your entire message or message + attachment cannot exceed 20MB.
The attachment format is the file’s content as a byte array or a Base64 string.
The maximum number of recipients has no limit for one campaign. It depends on the pricing plan.
The API has a limit of 20 concurrent connections and a hard timeout of 600 seconds per request.
On this page, you will find how to authenticate your application and what the requirements for the integration are. You will be also provided with a quick start guide on how to start using API, followed by code samples.
Authentication
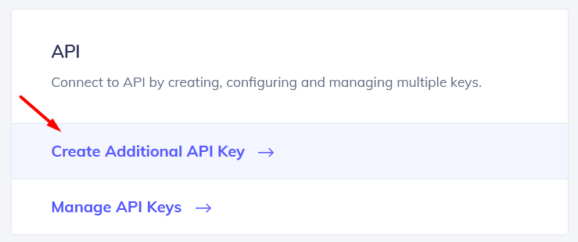
To provide valid authentication and start using our API, you will need an API key. To generate your API key, enter settings on your Elastic Email account and go to Settings -> Manage API Keys -> Create or you can also click on the link:
https://elasticemail.com/account#/settings/new/create-api

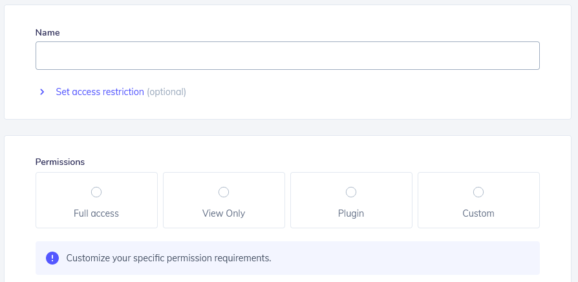
At this point, you can set custom permissions and optional access for your API key.
Security tip: The restriction forces the API Key to work only with an IP or IP range that will be specified in this field.

Once you create your API key, keep it safe as it will be used for every API call you make in order to identify you and confirm your account’s credentials. You can create either up to 15 or an unlimited amount of API keys based on your pricing plan.
Your API key should be sent inside the header with the parameter name ‘x-elasticemail-apikey’ and your API key as a value.
Installation and Usage
Installation
Our official downloadable Typescript Angular library is available on GitHub.
To install the required dependencies and to build the typescript sources run:
npm install
npm run build
publishing
First, build the package then run npm publish dist (don't forget to specify the dist folder!)
consuming
Navigate to the folder of your consuming project and run one of the next commands.
published:
npm install elasticemail-angular@4.0.21 --save
without publishing (not recommended):
npm install PATH_TO_GENERATED_PACKAGE/dist.tgz --save
It's important to take the tgz file, otherwise you'll get trouble with links on windows
using npm link:
In PATH_TO_GENERATED_PACKAGE/dist:
npm link
In your project:
npm link elasticemail-angular
Note for Windows users: The Angular CLI has troubles to use linked npm packages. Please refer to this issue angular/angular-cli#8284 for a solution / workaround. Published packages are not effected by this issue.
Usage
In your Angular project:
// without configuring providers
import { ApiModule } from 'elasticemail-angular';
import { HttpClientModule } from '@angular/common/http';
@NgModule({
    imports: [
        ApiModule,
        // make sure to import the HttpClientModule in the AppModule only,
        // see https://github.com/angular/angular/issues/20575
        HttpClientModule
    ],
    declarations: [ AppComponent ],
    providers: [],
    bootstrap: [ AppComponent ]
})
export class AppModule {}
// configuring providers
import { ApiModule, Configuration, ConfigurationParameters } from 'elasticemail-angular';
export function apiConfigFactory (): Configuration {
  const params: ConfigurationParameters = {
    // set configuration parameters here.
  }
  return new Configuration(params);
}
@NgModule({
    imports: [ ApiModule.forRoot(apiConfigFactory) ],
    declarations: [ AppComponent ],
    providers: [],
    bootstrap: [ AppComponent ]
})
export class AppModule {}
// configuring providers with an authentication service that manages your access tokens
import { ApiModule, Configuration } from 'elasticemail-angular';
@NgModule({
    imports: [ ApiModule ],
    declarations: [ AppComponent ],
    providers: [
      {
        provide: Configuration,
        useFactory: (authService: AuthService) => new Configuration(
          {
            basePath: environment.apiUrl,
            accessToken: authService.getAccessToken.bind(authService)
          }
        ),
        deps: [AuthService],
        multi: false
      }
    ],
    bootstrap: [ AppComponent ]
})
export class AppModule {}
import { DefaultApi } from 'elasticemail-angular';
export class AppComponent {
    constructor(private apiGateway: DefaultApi) { }
}
Note: The ApiModule is restricted to being instantiated once app wide. This is to ensure that all services are treated as singletons.
Using multiple OpenAPI files / APIs / ApiModules
In order to use multiple ApiModules generated from different OpenAPI files, you can create an alias name when importing the modules in order to avoid naming conflicts:
import { ApiModule } from 'my-api-path';
import { ApiModule as OtherApiModule } from 'my-other-api-path';
import { HttpClientModule } from '@angular/common/http';
@NgModule({
  imports: [
    ApiModule,
    OtherApiModule,
    // make sure to import the HttpClientModule in the AppModule only,
    // see https://github.com/angular/angular/issues/20575
    HttpClientModule
  ]
})
export class AppModule {
}
Set service base path
If different than the generated base path, during app bootstrap, you can provide the base path to your service.
import { BASE_PATH } from 'elasticemail-angular';
bootstrap(AppComponent, [
    { provide: BASE_PATH, useValue: 'https://your-web-service.com' },
]);
or
import { BASE_PATH } from 'elasticemail-angular';
@NgModule({
    imports: [],
    declarations: [ AppComponent ],
    providers: [ provide: BASE_PATH, useValue: 'https://your-web-service.com' ],
    bootstrap: [ AppComponent ]
})
export class AppModule {}
Using @angular/cli
First extend your src/environments/*.ts files by adding the corresponding base path:
export const environment = {
  production: false,
  API_BASE_PATH: 'http://127.0.0.1:8080'
};
In the src/app/app.module.ts:
import { BASE_PATH } from 'elasticemail-angular';
import { environment } from '../environments/environment';
@NgModule({
  declarations: [
    AppComponent
  ],
  imports: [ ],
  providers: [{ provide: BASE_PATH, useValue: environment.API_BASE_PATH }],
  bootstrap: [ AppComponent ]
})
export class AppModule { }
Quick start guide
In this section, we will tell you the steps to start sending emails with our email API.
1. Register a free account
Register and activate your Elastic Email account to get access to our product.
2. Verify your domain
Follow the instructions on our settings page to verify your domain and start sending with us.
3. Create an API Key
Go to your setting to generate an API Key to add to your code later.
4. Install our libraries
Install our Ruby library as explained in the Installation and usage section.
5. Send your first email with API
Now it’s time to send your first test email with API to make sure that everything is set up correctly after downloading the library and the authentication process.
require 'ElasticEmail'

ElasticEmail.configure do |config|
  config.api_key['apikey'] = '895A382DF3DCC13A97E72EXAMPLEKEY'
end

api_instance = ElasticEmail::EmailsApi.new

email = ElasticEmail::EmailMessageData.new(
  Hash[
    "recipients" => [ ElasticEmail::EmailRecipient.new(Hash["email" => "MeowWow "]) ],
    "content" => ElasticEmail::EmailContent.new(
      "body" => [ ElasticEmail::BodyPart.new(
        "content" => "My test email content ;)",
        "content_type" => "HTML"
        ) ],
      "subject" => "Ruby EE lib test",
      "from" => "MyEmail "
    )
  ]
)

begin
  api_instance.emails_post(email)
rescue ElasticEmail::ApiError => e
  puts "Exception when calling EE API: #{e}"
end
Ready to get started?
Tens of thousands of companies around the world already send their emails with Elastic Email. Join them and discover your own email superpowers.